Creating and using texture packs
As you'd expect the texture packs are very easy to use, but also they are very easy to create. It is a lot easier to create a texture pack, than to actually play Tomb Raider. The only tool required is Microsoft's Paint application, which comes as part of Windows. What is more, the textures can be of very much higher quality that the originals.
In fact, increasing the quality is the real purpose of this facility. By using texture packs, the textures can be increased in resolution by a factor of 4 in both dimensions. They can also be defined in 24 bit color, rather than the original 8 bit. Several artists are working on such a project. There are now packs for all but the atlantian levels: take a look at TRX.
Using texture packs
If you download a texture pack from the web, it will probably come in the form of a zip archive. You'll need to extract the contents of the archive. Windows XP has zip extraction built in - off the menu from right-clicking the archive. With other versions of Windows, you will need to obtain WinZip or similar. The extracted data will take the form of a folder calledTexturesCopy that folder into your Glidos folder, which should be
C:\Program Files\GlidosYou must also enable texture overriding. To do this, edit the file called
Glidos.iniwhich you will find in your Glidos folder. In that file you will see setting for the various games that Glidos supports. Add to the end of the section for TombRaider, a line that says
TextureOverride: YesNow play Tomb Raider through Glidos in the normal way, and you will see the replacement textures from the pack.
Creating texture packs
Creating a texture pack is a two stage process. First you get Glidos to create an initial texture pack from which to work. Then you create your texture pack by editing Bitmap files in a copy of this initial pack.To get Glidos to create the initial texture pack, you edit the Glidos.ini file, in this case adding the line
TextureOverride: CaptureThen run Tomb Raider and explore the level for which you wish to create a pack. It is important to explore the level thoroughly, looking at every texture you wish to replace. You can run Glidos several times to do this, saving as you go. So if you miss a texture, you can always come back to it later.
When you have finished exploring the level, you will find that the Glidos folder contains a subfolder called
CaptureDon't lose this; you may want to come back and reexplore your level. Make a copy of the folder, calling the copy
TexturesEdit the Glidos.ini file again, putting the setting to
TextureOverride: Yesand now you are ready to start creating your own textures. If you look inside this newly created folder, you will see subfolders with long names, and inside those lots of .bmp files, which contain the textures. All you need to do is edit these .bmp files. You can cut bits of pictures from a digital camera into them; you can scale them, you can draw on them - anything you like. The only provisos are that you must save them back with the same name and in 24 bit format, and they must be no greater than 256 by 256. In fact it is a good idea to make the very first thing you do to a texture, to load it into Paint and save it back in 24 bit format.
That's it, really. Have fun.
Tidying up
When you've finished defining all the textures you want to, you can then delete all the originals - the ones that you didn't edit. This will save a lot of space, and in any case, the original .bmp files, which are in 8 bit format, aren't used. Each subfolder also has a file called Complete.bmp. You can delete that too. Lastly you can delete a subfolder completely, if you didn't edit any of its .bmp files.Texture correction
Some textured surfaces in Tomb Raider are not rectangular. They are a sort of bent rectangle with sloping sides, known as a trapezium. Textures mapped onto trapezoidal surfaces become distorted as though gathered a little along one of the diagonals. To correct this effect, you need to preprocess your texture.
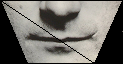 Identify the area of the texture to be applied to the
trapezoidal surface.
And pick one of the two diagonals, so as to split the surface
into triangles in the same way as when the surface is rendered.
You may have to use trial and error to get the right diagonal.
Identify the area of the texture to be applied to the
trapezoidal surface.
And pick one of the two diagonals, so as to split the surface
into triangles in the same way as when the surface is rendered.
You may have to use trial and error to get the right diagonal.
|
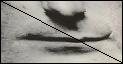
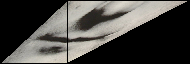 Skew the texture horizontally so that the two end points of the
selected diagonal are one above the other.
Skew the texture horizontally so that the two end points of the
selected diagonal are one above the other.
|
 Select the area encompassed by the left hand triangle, and stretch it horizontally
to match the size of that of the right hand one.
Select the area encompassed by the left hand triangle, and stretch it horizontally
to match the size of that of the right hand one.
|
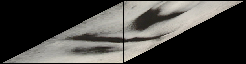
 Skew the texture horizontally, back in the opposite direction from
Step 2, so as to form a rectangle.
Skew the texture horizontally, back in the opposite direction from
Step 2, so as to form a rectangle.
|